Wednesday, 17 February 2016

3D Production - Week 3 - Feedback, Timing and Spacing, Blocking Pass


Feedback for shock reaction:


My feedback was that I hadn't followed my reference video close enough and I should of because it was realistic compared to what I animated. I also had it all at one speed so when redoing this reaction and starting my next one I need to make sure I am looking at the timing so its not all the same and boring.


Lesson:


"Technology doesn't make the motion picture, people do. You're not an animator just because you can move an object from point A to point B. (You're) someone who breathes life into a character, which is something the software and technology can't give you." - John Lasseter

In this lesson we looked at the importance of the animation and not just the way something looks. The movement gives something or someone personality and believability.


Love Recipe: http://www.youtube.com/watch?v=1ufQ9OUosKE&feature=related

This animation looked really nice but the animation was not as good as it could of been.

The Tale Of Mr. RĂªvus http://vimeo.com/27653079


3 second scene has about 6 drawings for the animator to reference, they can then adapt the drawings to exaggerate those pose and consider the staging.


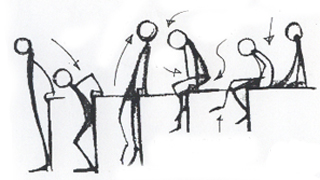
The purpose of a blocking pass is to make sure the key poses in your animation are right before you get onto the timing then the spacing. The sketches above represent the blocking stages, there can be broken down into further key poses.


 What you should aim for in your poses:

· Strong contrast (in pose and speed of movement)

· Absolute clarity

· Maximum expressions

· Maximum appeal

· Readable emotion and story

Blocking pass examples:


· http://www.youtube.com/watch?v=t2nH-NwJY0I (complex dialogue scene, 3 characters)

· http://www.youtube.com/watch?v=Q_lxEdejSGE (Simple dialogue scene, 1 character)
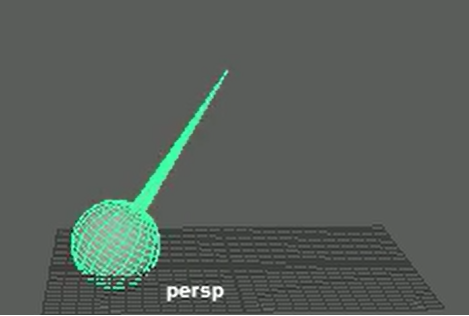


After discussing the above we went onto Maya to create custom keys, one for the whole rig, one for the body and one just for the head.


Instructions

Open up Script editor:

Windows – general editors – script editors.

Every time you do a command in Maya you will see some script appear in this box, what we need to do is highlight all the controls on the rig (excluding the face) then set a key frame. Once we have done that we can highlight all the MEL script in the box and turn it into an auto button.

Once you have it all highlighted, click on the save script to shelf button.

It will prompt you to name you button


For Lynda.com members you can follow this link to watch the video.

Class Task
For the class task and Homework we worked in partners to help each other think of a letterbox reaction. In the class we then had to act it out in front of the class and get feedback. For homework we have to block it out for next week.

In the class I chose to do someone who is in a rush and trying to find the letter in a hurry and are fumbling around for it.

My feedback after doing it in front of the class was to not look for the letter to robot like as it was the same speed. I also needed to think if they were angry about something.

For my homework I will take this feedback into account when filming my reference.

Tuesday, 16 February 2016

3D Production - Homework Task - Shock

For this task we had to come up with a shock reaction. My is reacting to someone telling him the amount of work there is to do.

I started by filming reference videos. At first i wanted it to be someone reading a book and then as they read they would become shocked by the long list and the amount of work there is to do. But when we filmed the reference videos I felt that wasn't very realistic and found it more comfortable and less like acting when i was sat down and reacting.
The videos go in order of when we were filming them, so by the end the idea become more and more clear and easier to act out.

https://vimeo.com/155543802


I liked the last couple of videos and knew I would be using them most to base my animation off.
I felt like i was ready after watching them a couple of times.

I started by key framing the animation. There wasn't a lot of body movement most of the work was in the facial expressions.
https://vimeo.com/155543739

As I was adding more frames and people watched we came up with the end result. It is not exactly like the reference video but i felt it worked better and still was reacting to the same thing.

The link below is adding more frames and starting to create the expression in the face.
https://vimeo.com/155543684

The link below is the final reaction after some help from class mates.
https://vimeo.com/155543717


I am happy with the end result and I like the use of exaggeration. Although it is not very complex and the body doesn't move a lot I feel I am improving with using Maya. I think next time i will try and push myself to do more now that i feel comfortable using it.

Critical and Contextual Issues - Week 3 - Priit Parn

This week we looked at Priit Parn, an Estonian Animator who first worked as a plan ecologist. His work is described as very political and characterised as black/dark humor, which opposes the mainstream Disney animation.  

We looked at some of his work:

1895 (made in 1995)


“When you're from a small country, everyone always stereotypes everything about you. I wanted to turn it around and stereotype all the big countries, like France, Sweden and Germany” - Priit Parn

This film examines the effect of technology especially computers and the internet on society and the power of the 'celebrity'.


Night of the Carrots (1998)

http://www.dailymotion.com/video/xk1aa0_priit-parn-porgandite-oo_shortfilms


This is another animation that explores the relationship between technology and it's affect on life. It also portrays themes of impending doom which at the time was the 'Millennium Bug'. The 'Millennium Bug' was a panic that computers would malfunction and potentially endanger electronic equipment worldwide.


Karl and Marilyn (2003)


This animation looks at celebrities and their relationship to western cultures. Karl is tired of fame and Marilyn is searching for fame.

Frank and Wendy (2004)

http://vk.com/video-24042394_159271822


These episodes are about secret agents restoring the truth and justice around strange parts in Estonia. This reflected the absurdity of Estonia at the time.


Breakfast on the Grass (1988)


This animation was created around the time that animation had gained freedom to create what they wanted. 


The painting Dejeuner sur I'herbe (1863) by Edouard Manet is said to have inspired Priit's work. Many people have argued that there are many similarities between the painting and his work. 


Hotel E (1991)

http://www.totalshortfilms.com/ver/pelicula/138

Our task was to watch this animation and then answer the following questions:

  • What is the film about?
  • How does the style/treatment contribute to the narrative?


This task will be on a separate post.

Critical and Contextual Issues - Hotel E Homework

We were asked to answer the following question about the animation 'Hotel E' by Priit Parn.

 http://www.totalshortfilms.com/ver/pelicula/138


Below is my answers to the question. This task was good to do as i started to think about wording and how to write more academically which is helpful for starting to write my essay.

Hotel E (1991)
What is it about?
The film switches between the stereotypical view of the American dream and sometimes faceless Eastern European drones sat around a table.  The drones are trying to escape their controlled life and become situated with American society. Once the one escapes he struggles at first to adapt to the new society and keeps going back to the dark room as he struggles to find the balance. The use of repetition shows how they are slowly becoming similar in the fact that they are turning into drones. After getting the American dream he realises that it had the same problems as the society he had just escaped from and that they had only dressed it up to hide this fact.

How does the style/treatment contribute to the narrative?

The use of the different styles does contribute to the narrative of the film. The dark and graphic style of the Eastern European society shows how miserable they are and how they are controlled. Where the use of bright colours for the American dream makes it look more appealing and leads them into false hope. Pretending it is something when it is not. 

Saturday, 13 February 2016

Creative Compositing - Week 2 - Green Screen

www.texturelib.com - free textures

In today's lesson we went down to the green screen room to be shown how to use and shoot our own footage.

Green screen basics - 
  • It a green colour because green is the furthest colour from human flesh tones
  • Shoot at high resolution
  • Light the green screen evenly
  • light the back of the actor or object
  • Plan the background before shooting the footage
  • Make sure props are not too shiny and don't reflect
 

Using the right camera- 

At the Uni we have a choice of cameras we can use. The suggested cameras were the DSLR and a normal camera recorder. We were given some pros and cons of using both the cameras and it was very helpful to learn about the cameras and how they worked.

For my project I will try and use both cameras so I can shoot from different angles and also so I can see which footage is better. We also need to make sure we plane before we film and we know exactly what we want to happen, this will make it easier on us and make sure we creae the best piece.


This lesson was extremely helpful as it gave us an understanding of how to use the green screen and how to get the best results from it. I will make sure i listen to the advice that has been given when it comes to my own project.

Links for videos I have found useful:


Thursday, 11 February 2016

Creative Compositing - Research into VFX and SFX

I wanted to researh into compositing a bit more to get a better understanding of things that can be made from it.

Special effects can be broken down into two categories: optical, and mechanical.

Optical effects are done by manipulating the camera and lighting which makes the scene look different. Things that can do this include: working with a different lense, different lighting, camera movements and angles.

Mechanical effects involves working during a live-action shot and making things look and seem like something they are not. For example: manipulating weather conditions, pyrotechnics and working with scale models.

Visual effects this includes: green screen, creating computer generated imagery (CGI), 3D rendering or animation.

This websites shows before and after green screen - 
http://digitalsynopsis.com/design/movies-before-after-green-screen-cgi/


 This was really interesting to see how they transformed green screen.

Avengers -
https://www.youtube.com/watch?v=MnQLjZSX7xM


Transformers -
https://www.youtube.com/watch?v=btn2tPxjisA


Deadpool -
https://www.youtube.com/watch?v=flqHc0-g1Ao


Guardians of the Galaxy -
https://www.youtube.com/watch?v=yDwmhC_4_IY


More VFX breakdowns from MPC -
http://www.moving-picture.com/reels/vfx-breakdowns/


All these videos and sites were interesting to watvh to see how they get to the final look of the film and how they make it look so real, I hope to achieve a realness with my project.


3D Production - Week 2 - Performance and Planning

In todays class we  started off by showing the research we had done for our homework, which is in a separate post.


 – former animator at ILM and co—founder of animationmentor.com


Filming video reference is great, but you can’t just copy it or you’re going to end up with a scene that isn’t as alive. Thumbnails are a great way to translate that video reference into poses and timing that are infused with your knowledge of the art of animation…”


When using my reference videos I should make sure I am not just copying them completely or the animation may become stiff and lifeless. Instead planning and drawing key poses from the reference can help bring life into the animation as we can push certain poses and see the lines of action, which all together will make our animation more dynamic.


We can also look at timing and decide if things should be faster or slower. We should be spending 20% of our time on the planning and every key decision should be made before we even turn on the computer. This will make sure we will get the best end result.


Ollie Johnston’s tips on character animation: written for 2D animation but apply to 3D animation.


1.     Spend half your time planning your scene and the other half animating.

2.     Don’t illustrate words or mechanical movements. Illustrate ideas or thoughts, with attitudes and actions.

3.     If possible, make definite changes from one attitude to another in timing and expression. (high contrast key poses)

4.     What is the character thinking?

5.     It is the thought and circumstances behind the action that will make the action interesting. Example: A man walks up to a mailbox, drops in his letter and walks away or A man desperately in love with a woman far away carefully mails a letter in which he has poured his heart out in.

6.     Don’t move anything unless it is for a purpose.

7.     Get the best picture in your drawing by thumbnails and exploring all avenues.

8.     Think in terms of drawing the whole character, not just the head or eyes, etc. Keep a balanced relation of one part of the drawing to the other.

A good example of this is the film Ormie: http://www.shortoftheweek.com/2011/07/29/ormie/


He wants a cookie but they are out of reach a Cookie but they are out of reach… or are they? This short animation plays on the simple acting scenario of intention verses obstacle. The appeal in this animation is the determination of the characters goal.


Bobby Beck explains authentic and memorable performances in your animation.


14 different versions of the same lip sync:

When making references just sticking to one video can limit yourself and you wont get a real life reaction. People react in different ways so trying the different options out will help to get the right kind of reaction. Even just changing from standing to sitting or using one arm and then the other can change the believability of the reference.  

Another good video to watch and reference videos:


Class work:

For our class work, we were shown how to use the graph editor in Maya and we used it to create a pendulum swing.

This is my one:
https://vimeo.com/157422764

I found this video explain the basics of the graph editor, it was good as a helpful reminder.


We were also shown how to save and set up MAX, and then we had to make his eyebrows raise, his heal roll and curl his hands.