Feedback for shock reaction:
My feedback was that I hadn't followed my reference video close enough and I should of because it was realistic compared to what I animated. I also had it all at one speed so when redoing this reaction and starting my next one I need to make sure I am looking at the timing so its not all the same and boring.
Lesson:
"Technology
doesn't make the motion picture, people do. You're not an animator just because
you can move an object from point A to point B. (You're) someone who breathes
life into a character, which is something the software and technology can't
give you." - John Lasseter
In this lesson we looked at the importance of the animation and not just the way something looks. The movement gives something or someone personality and believability.
Love Recipe: http://www.youtube.com/watch?v=1ufQ9OUosKE&feature=related
This animation looked really nice but the animation was not as good as it could of been.
The Tale Of Mr. Rêvus http://vimeo.com/27653079
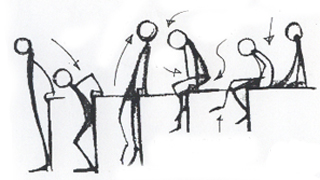
3 second scene has about 6 drawings for the animator to reference, they can
then adapt the drawings to exaggerate those pose and consider the staging.

The purpose of a blocking pass is
to make sure the key poses in your animation are right before you get onto the
timing then the spacing. The sketches above represent the blocking stages,
there can be broken down into further key poses.
What you should aim for in your poses:
· Strong contrast (in pose and
speed of movement)
· Absolute clarity
· Maximum expressions
· Maximum appeal
· Readable emotion and story
Blocking
pass examples:
· http://www.youtube.com/watch?v=1_kkd6qirgo
(lifting box)
· http://www.youtube.com/watch?v=t2nH-NwJY0I
(complex dialogue scene, 3 characters)
· http://www.youtube.com/watch?v=Q_lxEdejSGE
(Simple dialogue scene, 1 character)
After
discussing the above we went onto Maya to create custom keys, one for the whole
rig, one for the body and one just for the head.
Instructions
Open up
Script editor:
Windows –
general editors – script editors.
Every
time you do a command in Maya you will see some script appear in this box, what
we need to do is highlight all the controls on the rig (excluding the face)
then set a key frame. Once we have done that we can highlight all the MEL
script in the box and turn it into an auto button.
Once you
have it all highlighted, click on the save script to shelf button.
It will
prompt you to name you button
For
Lynda.com members you can follow this link to watch the video.
Blocking
pass tutorial: http://www.youtube.com/watch?v=yIZH-rPiJdU
For the class task and Homework we worked in partners to help each other think of a letterbox reaction. In the class we then had to act it out in front of the class and get feedback. For homework we have to block it out for next week.
In the class I chose to do someone who is in a rush and trying to find the letter in a hurry and are fumbling around for it.
My feedback after doing it in front of the class was to not look for the letter to robot like as it was the same speed. I also needed to think if they were angry about something.
For my homework I will take this feedback into account when filming my reference.
No comments:
Post a Comment